To lots of guitar players, improvising and soloing seems to be a game of choosing the correct scale to play with. Choosing a scale is a great shortcut to improvising, especially when it comes to blues music, but ignores many of the other key parts of soloing. Soloing is also a dance between rhythm choices, chord tones, and melodic creation. (Die deutsche Übersetzung dieses Artikels ist hier)

At this point you may be thinking, “Oh no more theory here we go again.” Nobody should be scared of learning theory. If you play chords and scales, you already use it all the time. Theory just helps you decide what notes to use when you’re improvising, that’s all!
So with that in mind, let’s talk about the easiest scale to start using and improvising with……
Your First Scale
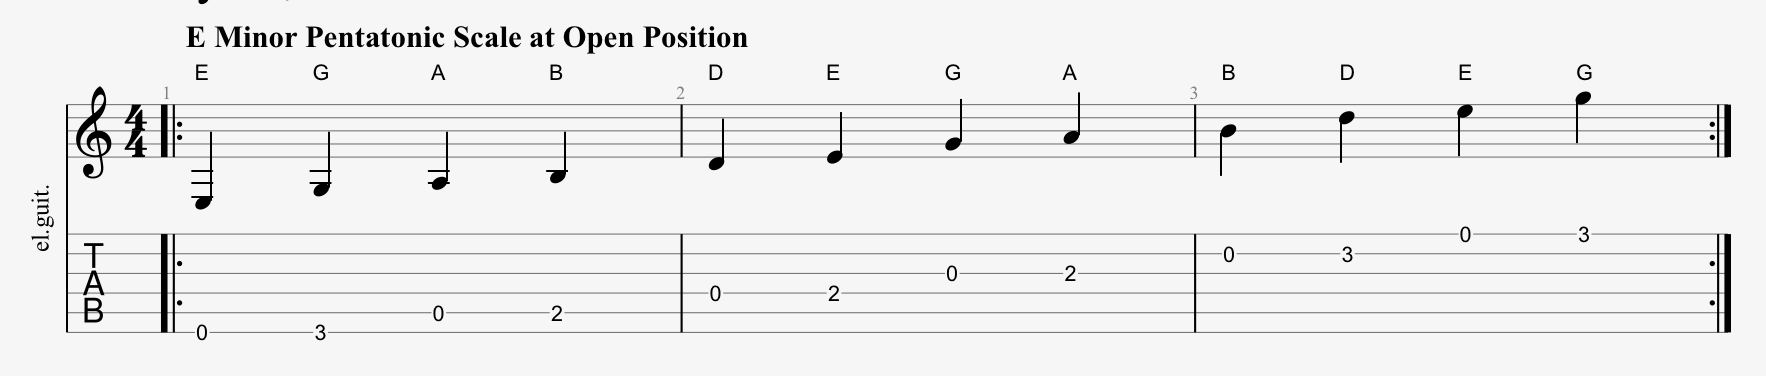
E Minor Pentatonic
If you’ve ever opened a book of guitar scales before, then you know that there is an overwhelming amount to choose from. Thankfully, the minor pentatonic scale is an extremely versatile scale that you can not only start using right away, but that is also easy to transform into other basic scales like major scales and minor scales.
The E Minor pentatonic is what we’ll talk about here, and it consists of just five notes: E – G – A – B – D. It’s not important to learn the notes though. All you need is a pattern, like this one below:

This one pattern right here is the source of so many guitar solos and licks that you’ll learn from here on out. It’s quite mind blowing how this one pattern appears in jazz, country, metal, rock, and pop music too.
All you need to do right now is just play the scale as shown in the tab below. You can play it straight up and down, bend a few notes, skip some notes, rest on a few at a time, or play them however you want.
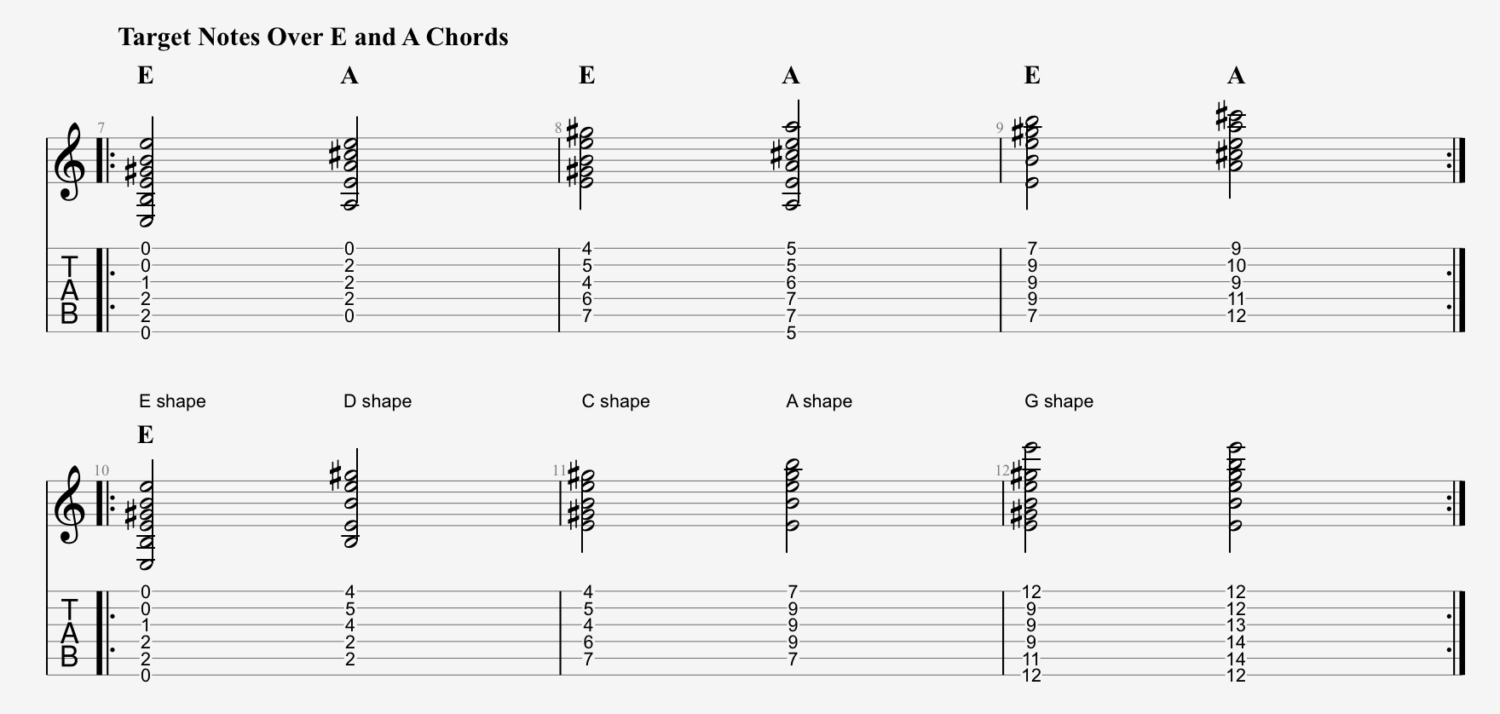
The Target Note Concept
If you start learning solos from Guns n’ Roses, Led Zeppelin, AC/DC, and many others you’re going to see that pattern above used nearly everywhere. However, how do you actually start to use it like they do?
That’s where the game of improvising and soloing comes into play. You will need to choose what scales, or what notes in general, to play over every chord that the rest of the band is playing. That’s the easy answer to how to improvise. The hard part though is deciding what notes to play and why.
A concept that will help you now, and for the rest of your guitar playing days, is something called the target note concept. All you do is choose a note that you’ll play when a certain chord comes up. So think of it like changing chords. You can focus on playing one note, like E, then decide to play an A note later on.
A very common chord progression is to play E major to A major, like the tab shows below:

When you’re wanting to play over E major, play the E note, or the other notes of the E chord like G# and B. When you’re playing over an A, play the A, C#, or E. This is basically how improvising works!
This rule is not strict though, which can further confuse you. You can also use scales other than E minor pentatonic to play over these chords. However that requires a longer discussion of how chords and key signatures are made. For now, just remember the simple rule that you must play a matching note for the relevant chord you’re playing over.
How To Learn The Notes On The Guitar Quickly
Now you know the basic “rules” of soloing and improvising. Now you’ve got to learn the notes on the fretboard so that you can apply these ideas in the best way possible.
Lots of websites online may claim that there’s some easy way to do this. There isn’t. You’ve got to find an image of the fretboard down below, and memorize the notes one by one.
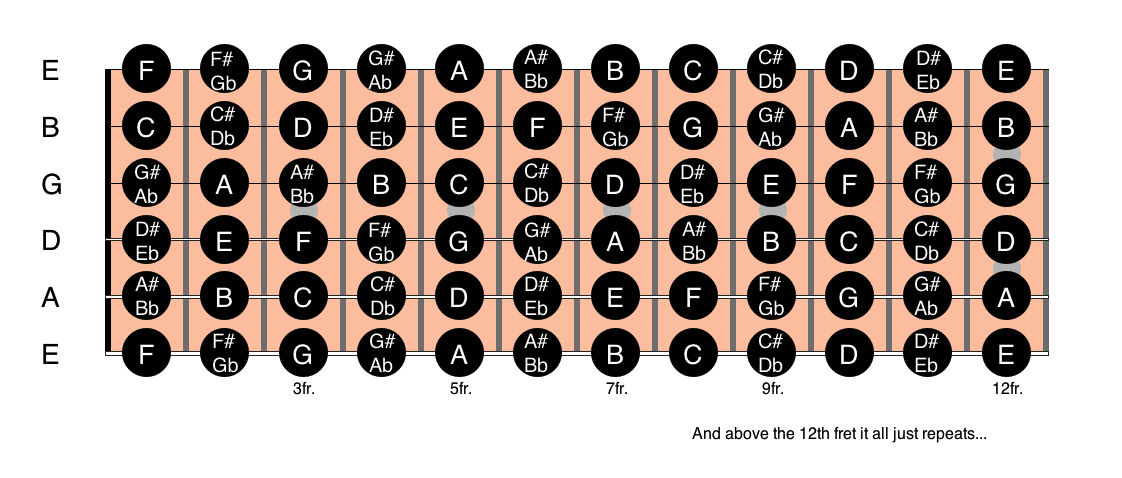
A few things to take note of:
1) This is in standard tuning to E natural
2) All the notes repeat after the 12th fret. So open G is also G at the 12th fret of the G string.
3) Learn the “natural” notes like C, D, E, F, G, B, and A first everywhere. Everything else is either C# or Db for instance.
4) There’s no notes between B and C, or E and F. So except for some weird situation where you’re playing in Cb major, there is no Cb or Fb you’ll run into anytime soon.
5) All the notes on low E and high E will have the same notes at each fret. So the note B on the high E string will also be a B on the low E string.
All of that aside, just print out an image of the fretboard, or save an image of the fretboard on your smart device. You can learn a note at a time, or a fret at a time. In my opinion, it’s easier to learn a fret at a time.
You’ll still need to practice finding and using these notes though! The first time learning these notes will be awkward and confusing, but push through it and you can start focusing on soloing.
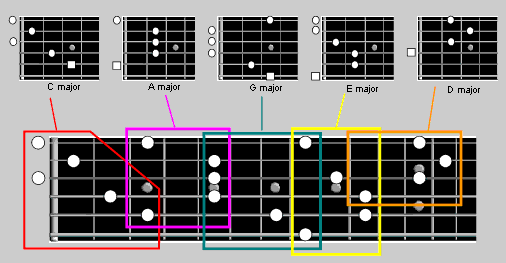
The Caged Concept
Once you learn the notes of the fretboard, you can use the scale pattern you learned above, as well as many others as you go along, much easier and quicker. However you’re going to want a way to organize all of these patterns and see the scale across the fretboard.
A scale book will help you see the rest of the patterns of a scale like E minor pentatonic, but you can also use a structure many people call the “CAGED” system. It’s pretty simple if you already know the chords C major, A major, G major, E major, and D major.

Look for the D shape at the 12th fret, the C shape between the 1st and 3rd frets, the A shape at the 5th fret, the G shape between the 7th and 8th frets, and finally the E shape at the 10th fret. Reread that last sentence carefully before moving on. Do you see the chords?
This is one of the absolute best ways to see and remember the most popular chord shapes down the fretboard. Once you learn more scales, and learn more about how chords work with scales, you’ll be able to use this system to improvise all over the fretboard.
You can also just learn the patterns of certain scales one by one. However, for improvising and soloing, it’s important that you learn as many chord shapes up and down the neck as possible.
Quick Recap
To quickly cover the concepts we just laid out, let’s list them below:
1) Start playing the E minor pentatonic scale as shown above. This scale will be the basis of many other scales you’ll learn in the near future. Don’t apply any rules to how you play with it!
2) Use the target note concept to plan where you’ll be on the fretboard when playing over chords. Just choose one note on one fret, and do that with every chord you’ll come across.
3) Take some time to print out or save an image of the entire fretboard with the notes on each fret. Memorize each fret at a time, and start using this information asap.
4) Taking the time to learn the CAGED system will help you when planning the target notes and choosing your scales. This will help you better see the chord shapes you’re working over as the music moves along.
There are lots of principles of guitar soloing and improvising that I can teach you. If this article has been helpful, I’ll hope you contact me for a guitar lesson. Thanks for reading!